Mastering Entry Models: The Crucial Role of Liquidity in Your Trading Strategy
Effective trade entries are the bedrock of successful trading. But simply identifying a potential supply and demand zone isn't enough. A key element often overlooked is liquidity. This article delves into the critical relationship between liquidity and entry models, providing you with practical strategies to improve your trading accuracy and profitability.
Liquidity to the Left: Fueling Your Trades
Before diving into specific entry models, it's crucial to understand the concept of "Liquidity to the Left." This principle emphasizes the importance of identifying areas where stop losses are likely clustered before entering a trade. These clusters of stop losses act as fuel, providing the necessary momentum for your trade to move in your intended direction.
Think of it this way: imagine a line of dominoes. The first domino (your entry) needs a push to start the chain reaction. That push comes from the activation of stop losses, triggering a cascade of orders that drive price movement. Without this "push," your trade might simply stall or even reverse.
Confirmation Entry: Leveraging Liquidity Sweeps
The Confirmation Entry is your go-to strategy when liquidity is readily available to the left of your entry zone. Here's the step-by-step process:
- Identify a Higher Timeframe (HTF) Supply or Demand Zone: Start by analyzing the larger trend and pinpointing significant areas where price has previously reacted.
- Look for a Liquidity Pool: Identify potential areas where stop losses are likely clustered. Common examples include:
- Swing Highs and Lows
- Equal Highs and Lows
- Trend Lines
- Wait for the Liquidity Sweep: This is the crucial step. Observe price action as it approaches the liquidity pool. You're looking for a quick move that "sweeps" through the area, triggering the stop losses.
- Enter on Lower Timeframe (LTF) Confirmation: After the sweep, switch to a lower timeframe to look for confirmation of the reversal. This could be a candlestick pattern, a break of structure, or other signals that align with your trading plan.
Example: Imagine price is approaching a HTF supply zone after an uptrend. You notice a series of equal highs just below the zone. These equal highs likely hold a significant amount of stop losses. You patiently wait for price to briefly push above those highs, triggering the stop losses, before reversing back down into the supply zone. This sweep provides the confirmation you need to enter a short position on the LTF.
Double Confirmation Entry: Navigating Liquidity Absence
What happens when there isn't any obvious liquidity to the left of your entry zone? This is where the Double Confirmation Entry comes into play. Since you lack the "fuel" provided by a liquidity sweep, you need additional validation.
- Identify HTF Supply/Demand: Same as before, start with the larger timeframe analysis.
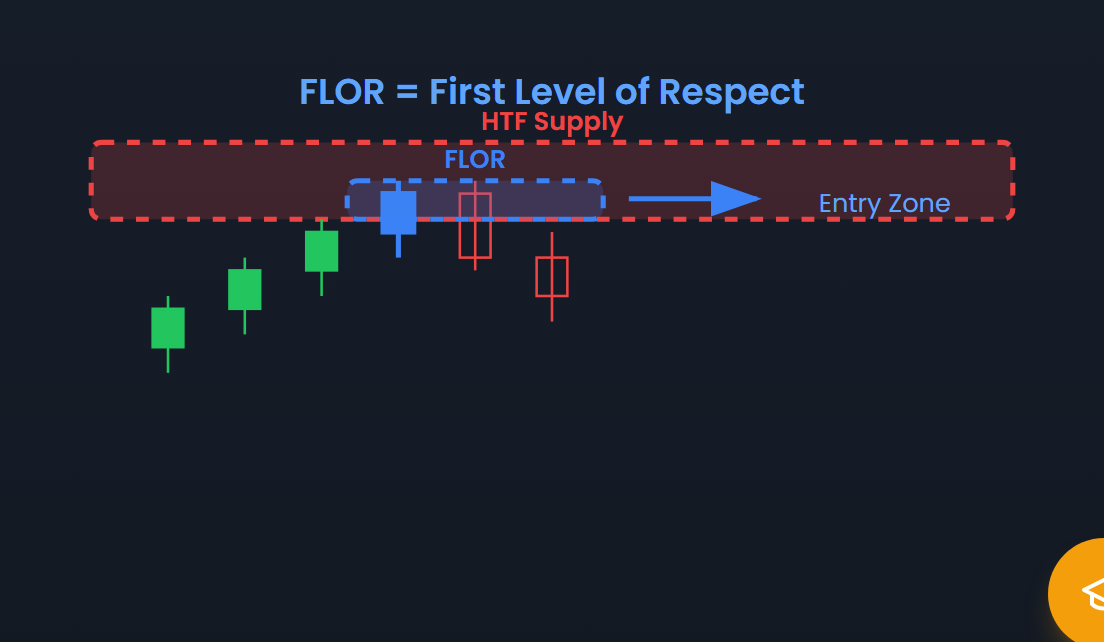
- Wait for Price to Reach the Zone and Create FLOR (First Level of Respect): FLOR is the initial reaction from the zone. Price touches the zone and shows a clear rejection.
- Wait for Price to Return to FLOR and Hold: This is the key step. Price retraces back to the FLOR level, and you're looking for it to act as support (in a demand zone) or resistance (in a supply zone).
- After FLOR Holds, the Next LPox (Last Point of Opposite Structure) Failure Confirms Your Entry: The LPox is the last significant high (for a short entry) or low (for a long entry) before the initial move away from the zone (FLOR). A failure to break this level further confirms the validity of the zone.
Example: Price approaches a HTF demand zone. You see no obvious liquidity pools nearby. Price touches the zone and bounces, creating FLOR. It then retraces back to the FLOR level, which now acts as support. The last significant high before the initial bounce (the LPox) is tested but fails to break. This double confirmation provides the confidence to enter a long position.
Zone Wipe Entry: Aggressive Entries at Extreme Levels
The Zone Wipe Entry is the most aggressive of the entry models and should only be used by experienced traders with a strong understanding of HTF context. It's employed when there's no liquidity to the left and you're trading at an extreme level (the outer edge of a HTF zone).
- Price Reaches the Extreme Level: Price touches the outermost edge of the HTF zone.
- Price May Wipe Through Previous Zones: Since there's no liquidity, price might initially push through the zone, "wiping" out any minor levels within.
- Look for Lower Timeframe Structure Shift: After the wipe, switch to a lower timeframe and look for a clear change in market structure, indicating a reversal.
- Enter on the New Demand/Supply Created After the Wipe: The structure shift will create a new, smaller demand or supply zone. Enter on the test of this new zone.
Caution: This entry model is high-risk because you're essentially betting on a reversal at the most extreme point. Make sure your HTF analysis strongly supports your bias.
Extreme Level vs. Decisional Level Entry: Choosing Your Entry Point
Within a supply or demand zone, you have options for where to place your entry.
- Extreme Level: Entering at the outer edge of the zone. This provides a tighter stop loss and a better risk-reward ratio. Use when you have high confidence in the level.
- Decisional Level: Entering at a zone flip or mid-level where previous resistance becomes support (or vice versa). Offers more structural confirmation but a slightly worse risk-reward. Use when you want additional safety.
The choice depends on your risk tolerance and the clarity of the order flow.
Key Takeaways
- Liquidity is fuel: Identify areas where stop losses are likely clustered before entering a trade.
- Confirmation Entry (Liquidity Present): Wait for the liquidity sweep and then enter on LTF confirmation.
- Double Confirmation Entry (Liquidity Absent): Look for FLOR to be created and held before entering.
- Zone Wipe Entry (Extreme Level & No Liquidity): Only for experienced traders; requires strong HTF bias and LTF structure shift.
- Extreme Level vs. Decisional Level: Choose your entry point within the zone based on your risk tolerance and conviction.
- FLOR is your backup: When liquidity is absent, FLOR provides the necessary confirmation.
By understanding the relationship between liquidity and entry models, you can significantly improve your trading accuracy and increase your chances of success. Remember to always practice proper risk management and continuously refine your strategy based on your own trading experience.